What Is ISO in Photography? A Beginner’s Guide to Understanding ISO
Cutout Partner
January 7, 2026
0 views
ISO is one of the most important camera settings every photographer must learn. While it is commonly grouped with shutter speed and aperture as part of the “exposure triangle,” ISO works a bit differently. Instead of controlling how much light enters the camera, ISO determines how sensitive your camera’s sensor is to light that is already available.
In this beginner-friendly guide, you’ll learn what ISO really means, how it affects your photos, when to raise or lower it, and how to use ISO effectively to achieve the best image quality in any shooting situation.
What Is ISO in Camera Basic?

At its core, ISO is a camera control that affects how light or dark your image appears. When you increase the ISO value, your photos become brighter; when you lower it, they become darker. This makes ISO especially useful when shooting in low-light situations or when you need more freedom to adjust your aperture and shutter speed.
That said, increasing ISO comes with a downside. Higher ISO levels introduce visible grain—commonly called digital noise—which can reduce image quality and detail. Because of this, using ISO to brighten an image is always a compromise. It’s best to increase ISO only when adjusting shutter speed or aperture isn’t an option, such as when a slower shutter speed would cause motion blur in your subject.
ISO is short for the International Organization for Standardization. While this organization develops international standards for a wide range of products and technologies, camera ISO is not a direct reference to its broader work.
In photography, the term ISO came into use in 1974 when two older film speed systems—ASA and DIN—were merged into a single standardized scale. From that point forward, film sensitivity was labeled simply as “ISO.”
Originally, ISO was used only to describe how sensitive photographic film was to light. As digital photography evolved, camera manufacturers adopted the same ISO system to ensure consistent brightness behavior between digital sensors and traditional film, making exposure settings familiar and easier to understand for photographers.
Common ISO Settings Explained

Every camera offers its own range of ISO values (often referred to as ISO speeds). While the exact limits vary by model, most cameras include a familiar set of options like these:
ISO 100 (very low sensitivity)
ISO 200
ISO 400
ISO 800
ISO 1600
ISO 3200
ISO 6400 (very high sensitivity)
The concept is simple: each time you double the ISO value, the brightness of your image also doubles. For example, a photo taken at ISO 400 will appear twice as bright as one shot at ISO 200, and ISO 200 will be twice as bright as ISO 100.
What Is Base ISO?

Base ISO refers to the lowest native ISO setting available on your camera. This setting is especially important because it delivers the best possible image quality, with the least amount of digital noise and the highest level of detail.
Different cameras have different base ISO values. Some older DSLR models and a few modern cameras—such as the Fuji X-T2—use a base ISO of 200. However, most current digital cameras are designed with a base ISO of 100.
For the cleanest and sharpest images, it’s best to shoot at your camera’s base ISO whenever conditions allow. That said, sticking to base ISO isn’t always practical. In low-light environments or fast-moving situations, you may need to increase ISO to achieve proper exposure or avoid motion blur.
Side Note
Some cameras include extended ISO settings labeled as “HI” or “LO,” which go beyond the camera’s native ISO range. These values are digitally simulated rather than true sensitivity adjustments, and they often reduce overall image quality.
For the best results, it’s generally recommended to avoid using these extended ISO options whenever possible.
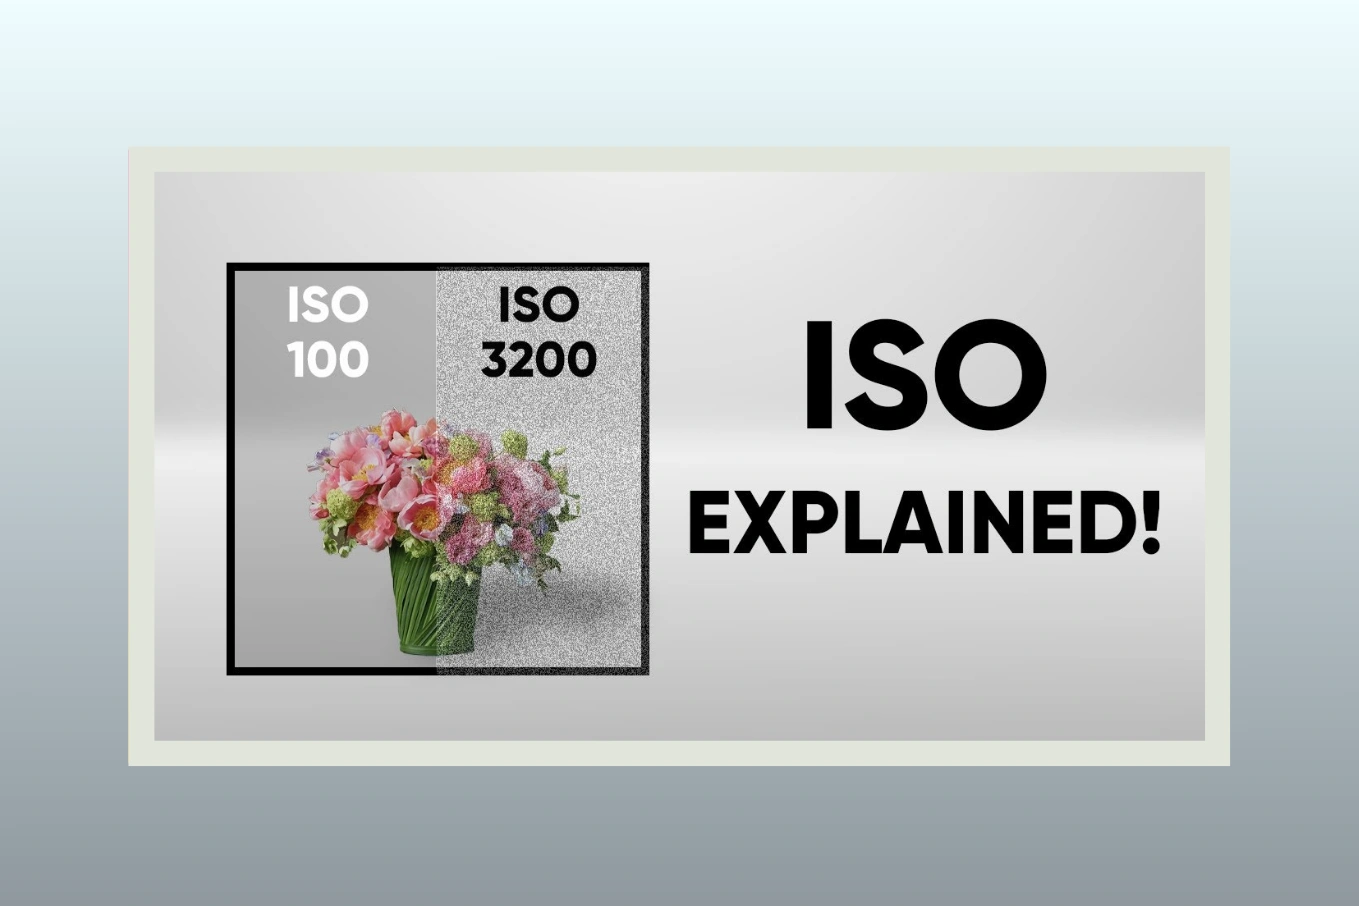
Noise Visibility: Low ISO vs High ISO
To better understand how ISO affects image quality, compare two photos taken at different ISO settings. Focus on the amount of visible noise—such as grainy texture and uneven color patches—in each image.
The contrast is easy to see. The photo captured at ISO 3200 shows significantly more noise than the image taken at ISO 200, which was brightened using a slower shutter speed instead. This is why it’s best to keep ISO as low as possible whenever lighting allows. Higher ISO values should only be used when the shooting conditions leave you with no other practical option.
How to Adjust ISO

The method for changing ISO depends on your camera model, but here are some common approaches:
Select a mode that allows manual ISO control. Switch out of Auto mode and choose Manual, Shutter Priority, Aperture Priority, or Program mode. Many photographers prefer Aperture Priority or Manual for better control.
Entry-level DSLRs and mirrorless cameras often require you to open the camera menu—sometimes the “quick menu”—to locate the ISO setting. From there, you can select your desired value or set it to Auto.
Higher-end cameras may feature a dedicated ISO button. Press it, then use one of the command wheels to adjust the ISO. If your camera doesn’t have a labeled ISO button, it might still allow you to assign this function to a custom button.
Some cameras include a dedicated wheel with preset ISO values marked directly on it, making it even faster and easier to switch settings.
If you’re unsure, consult your camera’s manual. Learning to adjust ISO quickly is essential, especially when shooting in low-light situations without a tripod or flash, as it’s one of the settings you’ll adjust most often.
Which ISO Scale Should You Use on Your Camera?

While many photographers grasp the fundamentals of ISO, deciding which ISO to actually use in real-life shooting can be tricky. Cameras offer a wide range of ISO values for a reason: different lighting conditions and shooting scenarios require different settings.
In the sections below, we’ll explore common situations you might encounter and suggest practical ISO choices for each.
When to Use a Low ISO
As mentioned earlier, it’s best to stick to your camera’s lowest native ISO—usually ISO 100 or 200—whenever possible. Using a low ISO in well-lit conditions helps produce the cleanest images with minimal noise.
Even in darker environments, you may still be able to use a low ISO if your camera is stable. For instance, if it’s mounted on a tripod or placed on a flat surface, you can safely keep ISO low and brighten your image by using a longer shutter speed. Since the camera isn’t moving, you won’t introduce blur from camera shake.
However, remember that long exposures will blur anything that moves within the frame: moving subjects can appear as ghostly streaks or soft blurs.
For example, in one shot I set my camera to the lowest ISO, which required a five-second exposure on a tripod to capture enough light. The subject stayed still, while my friend briefly walked into the frame, creating a fun “ghost” effect.
When to Use a High ISO
While using a low ISO is usually best for image quality, there are many situations where a higher ISO is necessary to get a properly exposed photo. The main reason is often motion—you’ll need to choose between a sharp photo at a high ISO or a blurry one at a low ISO.
For example, I captured a group of Black Skimmers in flight using ISO 800 with a shutter speed of 1/2000th of a second. The fast shutter was essential to freeze the birds’ motion. If I had tried shooting at ISO 100 instead, I would have needed a shutter speed of only 1/250th of a second to get the same brightness. At that slower speed, the fast-moving birds would have appeared blurred, ruining the shot.
The takeaway is simple: increase your ISO whenever there isn’t enough light to capture a sharp and properly exposed photo with the settings you need. When I shoot handheld indoors without a flash, I almost always raise the ISO to avoid blur. Similarly, when photographing fast-moving subjects like birds, sports, or action scenes, a higher ISO is often unavoidable.
Many cameras offer Auto ISO, which can be very useful in low-light situations. With this feature, you set a maximum ISO limit, preventing the camera from going beyond the level of noise you’re willing to accept. Personally, I often set the maximum at ISO 800, 1600, or 3200, depending on how much noise I’m willing to tolerate. Keep in mind, though, that if the camera reaches your ISO limit, it may start slowing the shutter speed to maintain brightness—again, a trade-off between noise and motion blur.
Minimizing Noise and Getting the Best Image Quality
Some photographers assume that the only way to achieve the highest-quality photos is to shoot at base ISO all the time. However, as we’ve seen, that isn’t always possible. In low-light situations, or when shooting fast-moving subjects, you may have no choice but to use a higher ISO.
Base ISO should only be used when lighting conditions allow it. Trying to force ISO 100 in a dim environment will result in underexposed, too-dark images. Similarly, using a very fast shutter speed to freeze action reduces the amount of light hitting the sensor—essentially creating a low-light scenario. In sports, wildlife, or other action photography, raising ISO may be the only way to get a sharp, properly exposed shot.
To get the best possible image quality, follow these four steps:
Choose your aperture to achieve the depth of field you want for the shot.
Set your ISO to its base value and adjust the shutter speed to achieve proper exposure.
If your subject is blurry, gradually increase ISO and use a faster shutter speed until motion blur is eliminated.
If ISO becomes too high, check whether you can open your aperture wider. Doing so may allow you to lower ISO to a more manageable level, even if it slightly changes your desired depth of field.
Following these steps will help you strike the right balance between noise, motion blur, and depth of field, ensuring you capture the highest image quality possible in any situation.
Common ISO Myths and Misconceptions
ISO is a camera setting that confuses a lot of photographers, and there are many myths around it. Let’s clear up the most common misunderstandings so you know how ISO really works.
Is ISO “Sensor Sensitivity”?
Many people think ISO changes the sensitivity of your camera sensor. This isn’t true. Your digital sensor has a fixed sensitivity. ISO doesn’t change how the sensor sees light—it tells the camera how bright the final image should be after the photo is captured. Think of ISO as a “brightness control” for your picture, not a magic sensor boost.
Is ISO Part of Exposure?
No. Exposure is determined by shutter speed (how long light hits the sensor) and aperture (how wide the lens opens). ISO doesn’t add light—it only brightens the image that has already been captured. That’s why photographers don’t count ISO as part of the actual exposure.
Is Raising ISO the Same as Brightening a Photo on a Computer?
Not really. Increasing ISO in-camera and brightening an image later on your computer can both make a photo brighter, but raising ISO while shooting usually gives better quality. Brightening a low-ISO photo too much in post-processing can make it look noisy and grainy. For example, it’s better to shoot at ISO 800 if needed than to take an ISO 100 photo and try to brighten it a lot on your computer.
What ISO Should You Use in Low Light?
In dark conditions, your shutter speed may slow down, which can cause blur from camera shake or moving subjects. To avoid this, increase your ISO to a higher number, like ISO 1600. Depending on the available light and your lens, you may need to raise ISO even more to keep your photo sharp and properly exposed.
What ISO Should You Use for Landscape Photography?
For landscapes, use a tripod and set ISO to your camera’s base ISO—usually ISO 100. This gives the cleanest images with the least amount of noise.
Should ISO Be Set Manually or Automatically?
It depends on what you’re shooting. For landscapes, manually using the base ISO works best. For fast-moving subjects or changing light conditions, it’s common to set your aperture and shutter speed manually while letting the camera choose ISO automatically. This helps keep your photos bright without losing sharpness.
Share this post

Ready to transform your images?
Elevate your brand with stunning, high-impact visuals. We’ll refine your photos to leave a lasting impression!
Get Started Now!